Power Units with 9VDC
Connect to SSID XpicoWiFi_xxxxxx. The xxxxxx will correspond with the Mac address on the bottom of the Can-WIFI unit.
- Password - XPICOWIFI
Enter 192.168.0.1 in the browser to enter the configuration.
- User Name – admin
- Password – PASSWORD
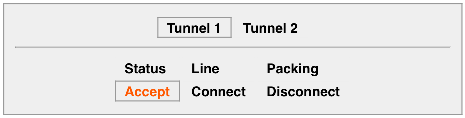
Select Tunnel from the list on the left
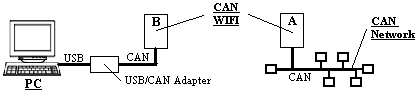
Unit A – Server
Choose “Tunnel 1” and “Accept” at the top of the page
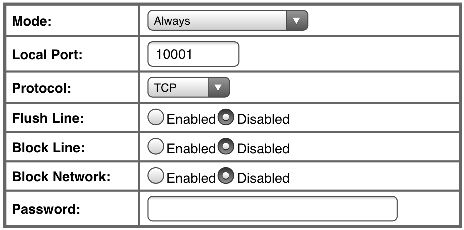
Choose the settings in the picture below for basic set up. You can enter a different Port or Mode if it is needed for the application.
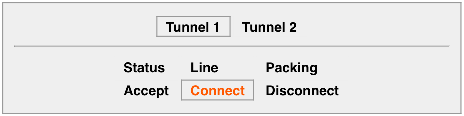
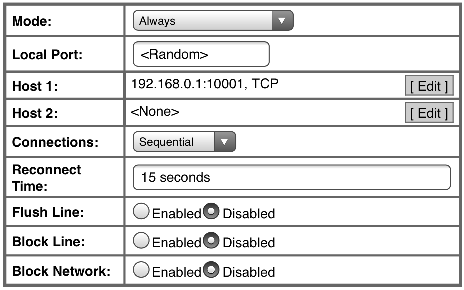
Unit B - Client
Choose “Tunnel 1” and “Connect” at the top of the page
Choose the settings in the picture below for basic set up.
Quick Connect
On unit B, Go to the tab at the top of the list on the left labeled QuickConnect .
Connect to the SSID being broadcast by unit A.
- Password - XPICOWIFI
That completes the tunnel between the CAN WiFi units. You should now be able to send CAN data over the wireless connection.
Recommended - Before connecting the CAN-WiFi units to the CAN network, try creating the tunnel first on a PC using two CAN/USB adapters. This will allow you to test and verify the connection before implementing it into a network. Depending on the CAN/USB adapter, you can either send/receive data using a terminal emulator, like Tera Term or Putty, or you can use the PCAN-View software (w/PCAN-USB.)

Comments
0 comments
Please sign in to leave a comment.